
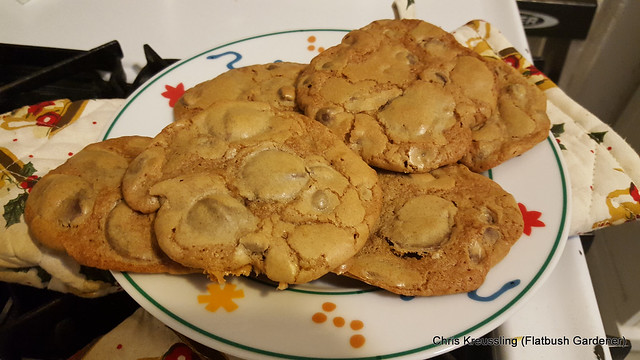
These cookies have been taste-tested recently at a going-away party and after-church coffee hour. Adults rave about this cookie. You will have no leftovers, even from a double batch.
I've been working on this recipe for a while, and I think I've finally got it to where I want it.
I started with "The Essential Chewy Chocolate Chip Cookie" from the King Arthur Flour Cookie Companion cookbook. I doubled the recipe, and made a few substitutions and additions, noted below.
I was getting the taste I wanted, but not the texture: they kept coming out too high and dry. They would rise in the oven, but they wouldn't fall.
I finally realized I just needed to reduce the flour called for in the original recipe to balance my other changes. This made them come out perfect, just the way I wanted them: slightly browned and crisp at the edges, soft and chewy in the centers.
I also like to amp up the chocolate chips, both by increasing the amount, and using different kinds, mixing milk and semi-sweet chocolates. My favorite are the chocolate drops from NYC's own Lilac Chocolates. They make them in at least three different varieties: milk, dark, and 72% extra-dark.
Pre-heat
Pre-heat your oven to 375F. You can also line some heavy-duty cookie sheets with parchment paper.Ingredients
- 3 sticks (1-1/2 cups, 12 oz) butter, warmed to room temperature
- Optional: 1/2 C smooth peanut butter (husband John loves peanut butter in everything)
- 1-1/3 C (10-1/2 oz) dark brown sugar
- 1-1/3 C (9-1/2 oz) granulated sugar
- 3/8 C (6T, 3-3/4 oz) maple syrup, as dark as you can get (this is a substitution for the corn syrup called for in the original recipe, and a 50% increase over the original amount)
- 2T (1/8C) cider vinegar (you can use white vinegar if you don't have cider)
- 1/4 C (4T) vanilla extract (this is double the original recipe. I love vanilla!)
- 1 teaspoon espresso powder OR 1 Starbucks Via packet (I like Via because it has a longer shelf life than the usual plastic container of espresso powder, which ossifies into useless slag, and because they have a decaf italian/dark roast.)
- Optional: 1/2 teaspoon kosher salt (omit to reduce sodium)
- 4 large eggs
- 1 teaspoon baking soda (this will react with the vinegar and brown sugar)
- 1 teaspoon baking powder
- 4 C (16 oz) whole wheat flour flour, sifted (The whole wheat makes a big difference in the flavor and texture. The original recipe calls for all-purpose/white flour. This is a reduction by about 1/8 from the original amount.)
Finally, stir in, by hand, the chocolate chips and chunks of your choice.
- 6 cups (36 oz) chocolate chips and/or chunks
Cover the dough tightly, so it doesn't dry out - some plastic food wrap pushed down onto the surface of the dough works well. - and chill in the refrigerator for a few hours, or overnight.
You can also start baking immediately. At this point, I'll bake at least one sheet of cookies, both to test the dough, and for (nearly) instant gratification.
Baking
- Pre-heat the oven to 375F. (But you did that already.)
- Cover a heavy-duty cookie sheet with parchment paper.
- Scoop out heaping tablespoons of dough onto the paper. Stagger them so they have room to spread without touching. On a standard-"half-sheet", I can get 5 rows from one end to the other with 3 heaps at each end and the center, and 2 heaps in between those rows. 3, 2, 3, 2, and 3: a baker's dozen!
- In the first few minutes after putting the tray in the oven, the dough should spread with the heat, and rise with the leaveners.
- Bake for 10-12 minutes. Your eyes and nose are the best judge of "done" here. Sniff for the slight smell of burnt sugar, and look for the edges to be set and just starting to darken. The centers should still look wet. Ideally, they will have started to collapse, but don't wait for that - you don't want them to set while risen.
- Remove the sheet and set aside. Let the cookies cool on the sheet until they slide easily without squishing, bending, or breaking up.
- Remove the individual cookies to a rack to cool completely. (Or eat while still warm and gooey).
No comments:
Post a Comment